Showing posts with label Halloween. Show all posts

Sunday, October 25, 2009

Halloween Cameos Collection 2009-2010


Pochi giorni fa sono riuscita a finire questi nuovi modelli:
9 cammei di Halloween,
su ognuno di essi è raffigurata una streghetta diversa, e diversi sono anche i dettagli e i colori, le classiche zucche, rose, teschietti, lune e fantasmini che si illuminano al buio...
Queste non sono disponibili in questo momento, e non sarebbero arrivate in tempo per Halloween 2009, per questo molto probabilmente le replicherò nel 2010 XD
Nel frattempo se siete interessati potete scrivermi un'e-mail a redfenyx.order@gmail.com

Some days ago I finally finished these new models.
9 Halloween Cameo Pendants,
each one is representing a different type of witch, and details and colours are different too, the classic pumpkins, roses, skulls, glowing in the dark moons and ghosties....
These ones are not available at the moment, anyway they won't arrive in time for Halloween, so I'll probably make them again in 2010 for those who are interested ^^
In the meanwhile if You're interested in some ones you can write me an e-mail to redfenyx.order@gmail.com to order them!


Leggi tutto...

Wednesday, October 07, 2009

Halloween Witches' Wreaths 2009


Finalmenteeee!!!!
Gli schizzi per queste coroncine di Halloween giacevano su pagine tristi da ben tre anni!
Dovevo farle un mese fa, e invece.... con la mia solita puntualità!
Be' vi presento queste piccole birbantelle:
Qui sopra la piccola Melinda, adora fare scherzi e giocare con il suo calderone magico, sotto anche in versione mignon! ^^

FINALLY!!!
I made the sketches of these Halloween wreath about three years ago!
My plan was to make them one month ago, but I'm not an "on time" person...
So here they are, let me introduce them!
The one on the top is the little Melinda, she loves making treats playing with her magic caldroun, on the bottom there's a 'lil version too ^^


La tenebrosa Cecilia, dai capelli blu notte, preferisce sfrecciare nel cielo stellato di notte ^^
The murky Cecilia, with blue hair as the dark sky is, preferes flying through the starry night ^^


Attenzione all'affascinante Kallista, attenzione perché è un po' pigrotta, e usa il suo fascino per ammaliare le persone e fargli fare.... i lavori pesanti XD

Be careful to the charming Melissa, she's a lazy witch and usually uses her charm to make poeple hard work instead of her! XD


Disponibili nel mio negozietto Etsy o inviando una e-mail a redfenyx.order@gmail.com
Available in my Etsy Shop or sending and e-mail to redfenyx.order@gmail.com


Leggi tutto...

Friday, October 02, 2009

How to: Halloween haunted house handmade tags


Cartellini Halloween : in questo tutorial troverete le indicazioni per realizzare passo per passo dei cartellini "casa infestata" per i vostri regali di Halloween, o per le vostre creazioni, se siete degli Handmader ^^
Leggete il resto e buon divertimento!

Halloween Haunted home Tags: in this tutorial You'll find the way to make some handmade tags for your Halloween gifts or for your creations, if You're a handmade artist ^^
Please click on "Leggi tutto" and have fun!


Materiali:
  • Tubetto di colla
  • Tappetino inchiostro nero
  • Timbrino
  • Cutter
  • Matite colorate
  • Matita bianca
  • Matita
  • Righello
  • Foratrice per fogli
  • Cartoncino nero
  • Cartoncino bianco
  • Forbici
  • Spago
Materials:
  • Glue tube
  • Black ink pad
  • Stamp
  • Cutter
  • Coloured pencils
  • White pencil
  • Pencil
  • Ruler
  • Paper hole maker
  • Black cardboard
  • White cardboard
  • Scissors
  • String

    Disegnate, con l'aiuto del righello, le targhette della dimensione che preferite.
    Ricordatevi che dovranno avere un'area di almeno il doppio dell'area del timbrino!
    Sul lato superiore di ogni rettangolo disegnate un piccolo triangolo nel mezzo.

    Draw, with the help of the ruler, the tags in the measure that You prefere.
    Remember that they must have at least the double of the area of your stamp!
    On the top side of each rectangle draw a little triangle on the middle.

Cominciate a tagliare e avrete delle targhette come quelle qui sopra.
Now start cutting and You'll have some tags like these ones.


Adesso prendete il vostro stampino, io ne ho usato uno intagliato sulla gomma l'anno scorso ^^ ma credo che se ne possano trovare in commercio in tema!
Stampate il timbrino su un cartoncino bianco.
Now take your stamp, I used my own handmade one made with white rubber, but I think that it will be easy to buy a themed one in stores. Imprint your stamp on the white cardboard.
Cominciate a colorare con le matite colorate, non c'è bisogno di essere troppo precisi :)
Tagliate dei rettangoli e ricordatevi di lasciare abbastanza margine attorno alla figura.
Start colouring with coloured pencils, You do not have to be too minute! And cut around some rectangulars, remember to leave a wide border!

Prendete il cartoncino nero e con una matita bianca disegnate le finestrelle.
Tagliate con il cutter lungo le linee di apertura e piegate le "alette" verso l'esterno.
Take the black cardboard and with a white pencil draw the window. Cut with the cutter along the "opening lines" and fold them toward outside.
Disegnate le finestrelle con la matita bianca su tutti e due i lati del cartoncino.
Draw the windows with the white pencil on both sides of the tag.


Passate il tubetto di colla lungo i bordi del cartoncino con l'immagine e sistemategli sopra la targhetta nera e premete lungo i bordi della finestrella.
Glue the perimeter of the white cardboard with the image and lay the black tag on the image. Press along the window boundary.

Con la matita bianca segnate il centro del triangolino e praticate un foro con la foratrice.
Sign the centre of the top triangle with the white pencil and make a hole with the hole maker.

Tagliate un pezzo di spago, fatelo scorrere attraverso il foro e annodate il cordino.
Cut a little piece of string, make it slide in the hole and make a knot.
Potete scrivere dei messaggi sul retro delle targhette et voilà!
You can write a short message on the back side of the tags.
And here they are!
Cute Halloween Tags!


Questi tutorial sono realizzati per chi si avvicina al mondo dell'handmade o per chi ha voglia di passare due ore di divertimento.
Se volete vendere le vostre creazioni siete liberi di utilizzare le tecniche base suggerite in questi tutorial ma vi prego di usare la vostra fantasia per realizzare vostri design originali.
Poiché questi tutorial non sono realizzati a scopo commerciale vi prego di seguire i seguenti DO&DON'Ts:
NON copiare, pubblicare in nessuna sede questo tutorial senza autorizzazione scritta
NON spacciarlo per tuo
NON vendere le creazioni realizzate con questo tutorial
Puoi prendere in prestito un'immagine e linkare il blog

These tutorials are made for people who are approaching handmade or for people who wants to have a couple of hours of fun.
If You'd like to sell your creations You are free to use basic techniques which these tutorials offer but use your fantasy to make your designs origiinal!
As they're not made for commercial purposes please follow these Do&Don'ts:
DO NOT copy, alter or publish anywhere this tutorial without written permission
DO NOT claim it as yours
DO NOT sell creations made from these tutorials

You can borrow an image linking back it to the blog.


Leggi tutto...

Friday, September 25, 2009

Halloween Witches Pendants 2009

Attenzione perché le streghette tra poco tornano in città! XD
Quattro sorelle birichine realizzate come collane per il prossimo Halloween.

Disponibili nel mio negozietto Etsy o inviando una e-mail a redfenyx.order@gmail.com

Be careful because little witches are coming to town! XD
Four impish sisters made as pendants to make some neckalces for the next Halloween.

Available in my Etsy Shop or sending and e-mail to redfenyx.order@gmail.com


Leggi tutto...

Sunday, September 20, 2009

How to: Halloween Decoration/Pins


Un piccolo tutorial per realizzare passo per passo delle decorazioni di Halloween in feltro,
in particolare io ho scelto una zucca e un fantasmino.
Queste creazioni potranno essere appese come decorazioni oppure indossate come spille ^^
Leggete il resto e buon divertimento!

This is a little tutorial to make some felt Halloween decorations, I chose a chubby pumpkin and a little ghots. These creations can be hang as home ornament or wore as pins! ^^ Read the rest clicking on "leggi tutto" and have fun!


Materiale:
  • Fogli di feltro 2/3mm arancione, marrone, bianco, nero, rosa;
  • Ago e Filo
  • Cartoncino bianco
  • Matita
  • Pennarello
  • Forbici
  • Pennarello per tessuti
  • Basi per spille
  • Nastro nero largo 1 cm o più
  • Ovatta
Material:
  • Felt fabric sheets: orange, white, pink, black, brown
  • needle and thread in matching colours
  • White cardboard paper
  • Pencil
  • Scissors
  • felt-tip
  • fabric felt-tip
  • pins bases
  • black ribbon of 1 cm width or more
  • filling

Cominciamo a tracciare a matita le sagome delle figurine che andremo a realizzare sul cartoncino bianco.
Let's start drawing with pencil the shapes of the figures on white cardboard paper.


Ricalchiamo le figure con il pennarello nero.
Trace the sketches with the black felt tip.


Tagliamo le sagome delle figurine e dei particolari come occhi e guance.
Cut the shapes of the figurines and of the details as eyes and cheeks.

Ricalchiamo le sagome delle figurine e dei dettagli sui fogli di feltro con il pennarello per stoffa, ricordate che avremo bisogno di due copie del corpicino, e vi consiglio di ricalcarli in modo speculare :)
Let's trace the silhouettes of the figurines and of details on the felt fabrics with the fabric felt-tip, remember that we'll need two copies of the bodies and I suggest You to trace them in a simmetric way :)


Tagliamo le sagome.
Let's cut all the shapes.


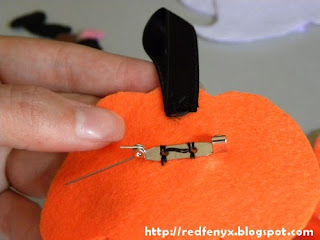
Cominciamo con il retro delle figurine: dobbiamo cucire prima di tutti il nastro e la spilla al centro.
Let's start from the back piece, we'll need to sew the black ribbon first of all and the pin base at the center.

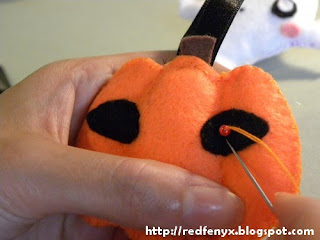
Adesso ci occuperemo dei pezzi a fronte, dobbiamo cucire tutti i dettagli come occhi e bocca.
Now we have to sew the front pieces as eyes, cheeks and mouth.


Cominciamo a cucire il pupazzino e ricordatevi di cominciare a riempire con il materiale di riempimento man mano che andate avanti con i dettagli.
Let's start sewing the two pieces of the body, and remember to start filling the body gradually while sewing.


Per la zucca dobbiano lavorare per 3 fasi: per dare l'idea dello "spicchio" dobbiamo riempire ogni zona e dare qualche punto lungo le linee dello schizzo.
For the pumpkin we have to work in 3 phases, we have to fill every warter and we have to sew few stitches along the lines of the skecthing to create a 3D sense.

Ecco come risulterà alla fine.
Gli occhi mi sembravano un po' vuoti così ho deciso di dargli un luccichio utilizzando una perlina rossa.
Andrebbe fatto all'inizio perché la cucitura si vedrebbe dietro la spilla :)
That's how it will look like at the end. The eyes looked kind of empty to me, so I decided to give them an "evil shine" sewing a red bead. It should be done at the beginning though, because it will appear in the back of the pin :)

Potete anche indossare queste creazioni la sera di Natale!
Sono perfette come ferma-sciarpa! Dovete solo fermare il nastrino dietro la spilla ^^
Divertitevi!
You can wear these ornaments on Halloween night! They're perfect as scarf-pins! You only have to hide the ribbon behind the pin ^^ Enjoy!


Questi tutorial sono realizzati per chi si avvicina al mondo dell'handmade o per chi ha voglia di passare due ore di divertimento.
Se volete vendere le vostre creazioni siete liberi di utilizzare le tecniche base suggerite in questi tutorial ma vi prego di usare la vostra fantasia per realizzare vostri design originali.
Poiché questi tutorial non sono realizzati a scopo commerciale vi prego di seguire i seguenti DO&DON'Ts:
NON copiare, pubblicare in nessuna sede questo tutorial senza autorizzazione scritta
NON spacciarlo per tuo
NON vendere le creazioni realizzate con questo tutorial
Puoi prendere in prestito un'immagine e linkare il blog

These tutorials are made for people who are approaching handmade or for people who wants to have a couple of hours of fun.
If You'd like to sell your creations You are free to use basic techniques which these tutorials offer but use your fantasy to make your designs origiinal!
As they're not made for commercial purposes please follow these Do&Don'ts:
DO NOT copy, alter or publish anywhere this tutorial without written permission
DO NOT claim it as yours
DO NOT sell creations made from these tutorials

You can borrow an image linking back it to the blog.


Leggi tutto...