


Un piccolo tutorial per realizzare passo per passo delle decorazioni di Halloween in feltro,
in particolare io ho scelto una zucca e un fantasmino.
Queste creazioni potranno essere appese come decorazioni oppure indossate come spille ^^
Leggete il resto e buon divertimento!
This is a little tutorial to make some felt Halloween decorations, I chose a chubby pumpkin and a little ghots. These creations can be hang as home ornament or wore as pins! ^^ Read the rest clicking on "leggi tutto" and have fun!
in particolare io ho scelto una zucca e un fantasmino.
Queste creazioni potranno essere appese come decorazioni oppure indossate come spille ^^
Leggete il resto e buon divertimento!
This is a little tutorial to make some felt Halloween decorations, I chose a chubby pumpkin and a little ghots. These creations can be hang as home ornament or wore as pins! ^^ Read the rest clicking on "leggi tutto" and have fun!


Materiale:
- Fogli di feltro 2/3mm arancione, marrone, bianco, nero, rosa;
- Ago e Filo
- Cartoncino bianco
- Matita
- Pennarello
- Forbici
- Pennarello per tessuti
- Basi per spille
- Nastro nero largo 1 cm o più
- Ovatta
- Felt fabric sheets: orange, white, pink, black, brown
- needle and thread in matching colours
- White cardboard paper
- Pencil
- Scissors
- felt-tip
- fabric felt-tip
- pins bases
- black ribbon of 1 cm width or more
- filling


Cominciamo a tracciare a matita le sagome delle figurine che andremo a realizzare sul cartoncino bianco.
Let's start drawing with pencil the shapes of the figures on white cardboard paper.
Let's start drawing with pencil the shapes of the figures on white cardboard paper.

Ricalchiamo le figure con il pennarello nero.
Trace the sketches with the black felt tip.
Trace the sketches with the black felt tip.


Tagliamo le sagome delle figurine e dei particolari come occhi e guance.
Cut the shapes of the figurines and of the details as eyes and cheeks.
Cut the shapes of the figurines and of the details as eyes and cheeks.
 Ricalchiamo le sagome delle figurine e dei dettagli sui fogli di feltro con il pennarello per stoffa, ricordate che avremo bisogno di due copie del corpicino, e vi consiglio di ricalcarli in modo speculare :)
Let's trace the silhouettes of the figurines and of details on the felt fabrics with the fabric felt-tip, remember that we'll need two copies of the bodies and I suggest You to trace them in a simmetric way :)


Tagliamo le sagome.
Let's cut all the shapes.


Let's cut all the shapes.


Cominciamo con il retro delle figurine: dobbiamo cucire prima di tutti il nastro e la spilla al centro.
Let's start from the back piece, we'll need to sew the black ribbon first of all and the pin base at the center.

 Adesso ci occuperemo dei pezzi a fronte, dobbiamo cucire tutti i dettagli come occhi e bocca.
Now we have to sew the front pieces as eyes, cheeks and mouth.
Let's start from the back piece, we'll need to sew the black ribbon first of all and the pin base at the center.

 Adesso ci occuperemo dei pezzi a fronte, dobbiamo cucire tutti i dettagli come occhi e bocca.
Now we have to sew the front pieces as eyes, cheeks and mouth.


Cominciamo a cucire il pupazzino e ricordatevi di cominciare a riempire con il materiale di riempimento man mano che andate avanti con i dettagli.
Let's start sewing the two pieces of the body, and remember to start filling the body gradually while sewing.

Let's start sewing the two pieces of the body, and remember to start filling the body gradually while sewing.

 Per la zucca dobbiano lavorare per 3 fasi: per dare l'idea dello "spicchio" dobbiamo riempire ogni zona e dare qualche punto lungo le linee dello schizzo.
For the pumpkin we have to work in 3 phases, we have to fill every warter and we have to sew few stitches along the lines of the skecthing to create a 3D sense.

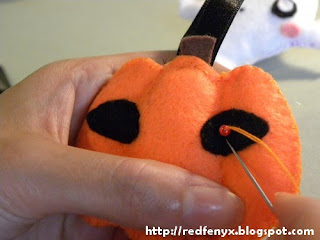 Ecco come risulterà alla fine.
Gli occhi mi sembravano un po' vuoti così ho deciso di dargli un luccichio utilizzando una perlina rossa.
Andrebbe fatto all'inizio perché la cucitura si vedrebbe dietro la spilla :)
That's how it will look like at the end. The eyes looked kind of empty to me, so I decided to give them an "evil shine" sewing a red bead. It should be done at the beginning though, because it will appear in the back of the pin :)
Potete anche indossare queste creazioni la sera di Natale!
Sono perfette come ferma-sciarpa! Dovete solo fermare il nastrino dietro la spilla ^^
Divertitevi!
You can wear these ornaments on Halloween night! They're perfect as scarf-pins! You only have to hide the ribbon behind the pin ^^ Enjoy!


 Ecco come risulterà alla fine.
Gli occhi mi sembravano un po' vuoti così ho deciso di dargli un luccichio utilizzando una perlina rossa.
Andrebbe fatto all'inizio perché la cucitura si vedrebbe dietro la spilla :)
That's how it will look like at the end. The eyes looked kind of empty to me, so I decided to give them an "evil shine" sewing a red bead. It should be done at the beginning though, because it will appear in the back of the pin :)
Potete anche indossare queste creazioni la sera di Natale!
Sono perfette come ferma-sciarpa! Dovete solo fermare il nastrino dietro la spilla ^^
Divertitevi!
You can wear these ornaments on Halloween night! They're perfect as scarf-pins! You only have to hide the ribbon behind the pin ^^ Enjoy!

Questi tutorial sono realizzati per chi si avvicina al mondo dell'handmade o per chi ha voglia di passare due ore di divertimento.
Se volete vendere le vostre creazioni siete liberi di utilizzare le tecniche base suggerite in questi tutorial ma vi prego di usare la vostra fantasia per realizzare vostri design originali.
Poiché questi tutorial non sono realizzati a scopo commerciale vi prego di seguire i seguenti DO&DON'Ts:
 NON copiare, pubblicare in nessuna sede questo tutorial senza autorizzazione scritta
NON spacciarlo per tuo
NON vendere le creazioni realizzate con questo tutorial
 Puoi prendere in prestito un'immagine e linkare il blog
Se volete vendere le vostre creazioni siete liberi di utilizzare le tecniche base suggerite in questi tutorial ma vi prego di usare la vostra fantasia per realizzare vostri design originali.
Poiché questi tutorial non sono realizzati a scopo commerciale vi prego di seguire i seguenti DO&DON'Ts:
NON copiare, pubblicare in nessuna sede questo tutorial senza autorizzazione scrittaNON spacciarlo per tuoNON vendere le creazioni realizzate con questo tutorialPuoi prendere in prestito un'immagine e linkare il blog These tutorials are made for people who are approaching handmade or for people who wants to have a couple of hours of fun.
If You'd like to sell your creations You are free to use basic techniques which these tutorials offer but use your fantasy to make your designs origiinal!
As they're not made for commercial purposes please follow these Do&Don'ts:
DO NOT copy, alter or publish anywhere this tutorial without written permission
DO NOT claim it as yours
DO NOT sell creations made from these tutorials
You can borrow an image linking back it to the blog.
If You'd like to sell your creations You are free to use basic techniques which these tutorials offer but use your fantasy to make your designs origiinal!
As they're not made for commercial purposes please follow these Do&Don'ts:
DO NOT copy, alter or publish anywhere this tutorial without written permissionDO NOT claim it as yoursDO NOT sell creations made from these tutorialsYou can borrow an image linking back it to the blog.Leggi tutto...


